Unwrap Sweetness: The Magic of Stress-Free Microwave Caramels for Holiday Gifting
The holiday season is a whirlwind of joy, gatherings, and often, a dash of stress. If your December calendar is already overflowing, but your heart yearns to create thoughtful, homemade gifts, we have the perfect solution: microwave caramels. Imagine soft, impossibly chewy, buttery squares of golden goodness, kissed with a hint of sea salt, all made with minimal effort and without the dreaded candy thermometer. This isn't just a recipe; it's your secret weapon for stress-free holiday gifting and delightful personal indulgence.
Forget the stovetop drama and endless stirring. These Foolproof Microwave Caramels: No Candy Thermometer Required are a game-changer, transforming simple pantry staples into a luxurious treat that tastes like it came from a gourmet candy shop. Whether you're filling festive tins for friends, adding a homemade touch to dessert trays, or simply satisfying a sudden craving for something sweet, this easy microwave caramel recipe delivers maximum payoff with minimal fuss.
Why Microwave Caramels Are Your Holiday Season Superpower
In a world where time is a precious commodity, especially during the holidays, finding a recipe that saves you time without sacrificing quality is like striking gold. Microwave caramels truly are a superpower for several compelling reasons:
- A Lifesaver for Busy Schedules: Traditional candy making can be an hours-long commitment. This method slashes that time dramatically, allowing you to whip up a batch (or even a double batch!) in mere minutes. You can fit it into a quick break between errands or while dinner is simmering.
- Foolproof & Reliable: Many home cooks shy away from candy making due to its perceived difficulty and the precision required. The beauty of these microwave caramels is their incredible forgiveness. The process is straightforward, and the results are consistently perfect – soft, chewy, and utterly delicious – even for absolute beginners.
- Simple Ingredients, Incredible Flavor: You don't need exotic components. With just a few basic pantry staples – butter, granulated sugar, brown sugar, light corn syrup, and sweetened condensed milk – you can create a candy that rivals any old-fashioned caramel recipe. The rich combination melts together to form a smooth, glossy mixture bursting with classic caramel flavor.
- No Stovetop Stress: One of the biggest advantages is avoiding the constant vigilance and stirring often associated with stovetop candy. The microwave does the bulk of the heating, requiring only intermittent stirring to ensure even cooking and prevent scorching.
The Core Ingredients & How They Work Together for Perfect Caramels
The magic of these simple microwave caramels lies in the synergy of a few key ingredients:
- Butter: This provides the foundational richness and helps create that signature smooth, melt-in-your-mouth texture. It’s essential for a truly luxurious caramel.
- Sugars (Granulated & Brown): The blend of both sugars offers a balanced sweetness and depth of flavor. Granulated sugar provides the primary sweetness, while brown sugar contributes molasses notes, adding complexity and a richer color to your caramels.
- Light Corn Syrup: This is the unsung hero of many candy recipes, including these microwave caramels. Corn syrup is an invert sugar that plays a critical role in preventing sugar crystallization, which can lead to grainy caramels. It ensures your caramels remain wonderfully smooth, soft, and chewy.
- Sweetened Condensed Milk: Adding a luxurious creaminess and body, sweetened condensed milk contributes another layer of sweetness and helps achieve that characteristic opaque, rich caramel appearance and delightful chew.
- Sea Salt (Optional but Highly Recommended): A sprinkle of flaky sea salt over the finished caramels isn't just for show. It perfectly balances the sweetness, enhancing the overall flavor profile and adding a sophisticated touch that elevates the entire experience.
Crafting Perfect Soft & Chewy Microwave Caramels Every Time
Achieving that ideal soft and chewy texture with your microwave caramels is surprisingly simple. Here's how to ensure success:
Preparation is Key
- Choose the Right Bowl: Always use a very large, microwave-safe bowl. The caramel mixture will bubble up significantly as it cooks, and a spacious bowl prevents messy boil-overs.
- Prepare Your Pan: Line an 8x8 or 9x9 inch square baking pan with parchment paper, leaving an overhang on the sides. Lightly butter the parchment paper. This step is crucial for effortlessly lifting out and cutting your caramels once they're set.
The Microwave Method
The process is straightforward: combine your ingredients in the prepared bowl, and microwave in short intervals, stirring thoroughly between each. A common pattern might be an initial 90 seconds, followed by several 2-3 minute bursts. The key is to stir well after each interval to ensure even cooking and prevent any part of the mixture from scorching or cooking unevenly. As you stir, you'll notice the mixture gradually thickening and darkening to a beautiful amber hue.
Knowing When It's Done (No Thermometer Method)
This is where the "no candy thermometer" promise shines! While a thermometer can be used (aim for 238-242°F for the soft-ball stage), you can confidently tell your microwave caramels are ready with a simple visual and texture test:
- The Cold Water Test: Keep a glass of ice water handy. Drop a very small amount of the hot caramel mixture into the cold water. Let it sit for a few seconds, then retrieve it. If it forms a soft, pliable ball that you can easily mold with your fingers, it's ready! If it's too hard and brittle, it's slightly overcooked (though still likely delicious). If it dissolves or is too sticky to form a ball, it needs a bit more time in the microwave.
- Color and Consistency: Look for a rich, deep golden or amber color and a visibly thickened, glossy consistency. The mixture should feel significantly heavier on your spoon.
Remember that microwave wattages vary, so cooking times are approximate. Trust your visual cues and the cold water test more than strict adherence to a timer.
Cooling & Cutting
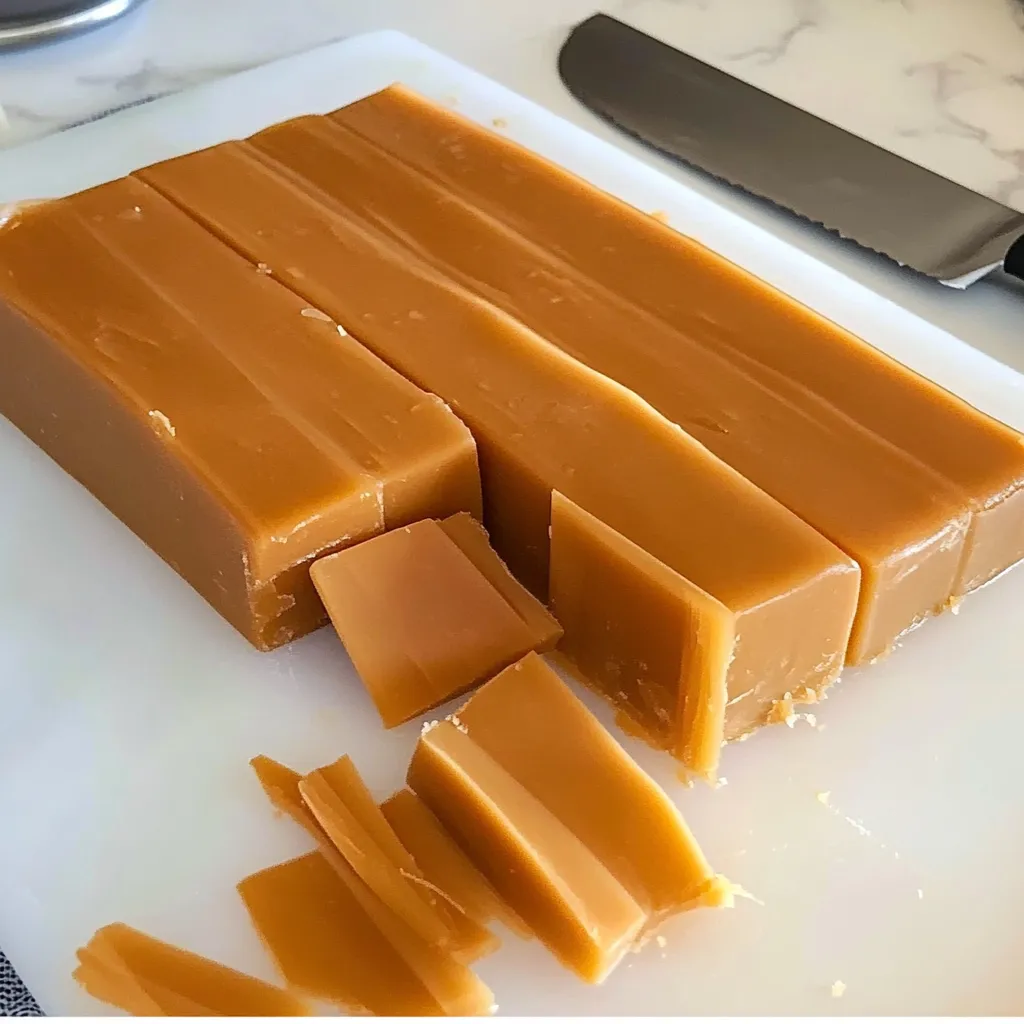
Once your caramels are perfectly cooked, pour the hot mixture immediately into your prepared pan. This is the moment to sprinkle on that optional sea salt! Allow the caramels to cool completely at room temperature, which can take several hours. Rushing this step by placing them in the fridge too soon can sometimes affect the final texture. Once fully set, use the parchment paper overhang to lift the slab of caramel from the pan. Using a sharp, lightly oiled knife, cut into desired squares or rectangles. For more quick and simple homemade treats, explore Quick Microwave Caramels: Simple Pantry Ingredients, Fast Treat.
Beyond the Batch: Creative Gifting & Flavor Twists
Once you’ve mastered these effortless microwave caramels, the possibilities for enjoyment and gifting are endless!
- Elegant Holiday Gifts: These homemade caramels make incredibly thoughtful and impressive gifts. Wrap individual pieces in small squares of wax paper or cellophane, then arrange them artfully in decorative tins, boxes, or cellophane bags tied with festive ribbons. No one will ever guess how simple they were to make!
- Dessert Tray Stars: Elevate your holiday dessert platters by including a selection of these beautiful caramels. They offer a delightful textural and flavor contrast to cookies, cakes, and other confections.
- Flavor Enhancements: Don't hesitate to get creative with your batches:
- Chocolate-Dipped Caramels: After your caramels have cooled and been cut, melt some high-quality chocolate (dark, milk, or white) and dip half or all of each caramel. Sprinkle with a little extra sea salt before the chocolate sets for an extra touch.
- Nutty Caramels: Fold in a cup of chopped pecans, walnuts, or almonds just before pouring the hot caramel into your prepared pan for a delightful crunch.
- Spiced Variations: Add a teaspoon of pure vanilla extract at the end, or experiment with a pinch of cinnamon, a dash of cardamom, or even a teaspoon of instant espresso powder for unique and delicious twists.
- Freezer Friendly: Make a double batch! These caramels freeze beautifully. Once fully cooled and cut, store them in an airtight container between layers of parchment paper in the freezer for up to three months. They’ll be ready whenever a craving strikes or an unexpected guest arrives.
Whether you're looking to create heartfelt gifts, add a homemade touch to your holiday spread, or simply treat yourself to a moment of sweet indulgence, microwave caramels are the perfect solution. They embody the spirit of homemade goodness without the accompanying stress, leaving you more time to enjoy the magic of the season.
