Quick Microwave Caramels: Your New Go-To for Effortless Sweet Indulgence
Imagine a world where crafting decadent, buttery, melt-in-your-mouth caramels doesn't involve hours over a hot stove, anxious glances at a candy thermometer, or a list of obscure ingredients. That world is here, and it's powered by your microwave! Welcome to the revolutionary simplicity of
quick microwave caramels. This isn't just another recipe; it's a game-changer for anyone craving homemade candy without the fuss. With just a handful of everyday pantry ingredients and a few minutes of microwave magic, you can whip up a batch of soft, chewy treats that taste like they came straight from an old-fashioned candy shop. Get ready to impress your taste buds and everyone lucky enough to share them, all while keeping your stress levels firmly at zero.
Why Microwave Caramels Are Your New Favorite Fast Treat
The allure of homemade caramels has always been strong, but the traditional method can be intimidating. Enter the microwave, transforming a complex confection into a truly "set it and forget it" (almost!) experience. Here’s why these
microwave caramels are poised to become your culinary obsession:
*
No Candy Thermometer Needed: This is perhaps the biggest draw for many home cooks. Traditional caramel recipes often demand precise temperature control, but our method relies on simple visual cues and timings, making it truly foolproof. You can learn more about this stress-free approach in our guide to
Foolproof Microwave Caramels: No Candy Thermometer Required.
*
Speed and Efficiency: Forget endless stirring. The microwave handles the cooking, dramatically cutting down active preparation time. You'll go from ingredients to a pan of cooling caramel in a matter of minutes.
*
Simple Pantry Ingredients: No fancy extracts or obscure thickeners required. You likely have everything you need in your kitchen right now: butter, sugars, light corn syrup, and sweetened condensed milk.
*
Consistently Delicious: Despite the ease, the flavor and texture are anything but compromised. These caramels boast the classic rich, buttery taste and satisfying chewiness that caramel lovers adore.
*
Versatility Galore: Whether you're looking for a personal indulgence, an impressive edible gift, or a stellar addition to your holiday dessert trays, these caramels fit every occasion. They're especially perfect for
Soft & Chewy Microwave Caramels for Stress-Free Holiday Gifts.
The Magic Behind Simple Ingredients: What Makes Them So Good?
At the heart of these incredible
microwave caramels lies a brilliant combination of accessible ingredients, each playing a crucial role in achieving that perfect caramel bliss.
*
Butter: The foundation of flavor and richness. Good quality butter is essential here, contributing to the creamy, melt-in-your-mouth texture and irresistible taste.
*
Granulated Sugar & Brown Sugar: While granulated sugar provides the sweetness and structure, brown sugar adds depth of flavor, a hint of molasses, and contributes to the signature chewy texture and rich color. Using both creates a more complex and satisfying caramel profile.
*
Light Corn Syrup: Often seen as the unsung hero of candy making, light corn syrup is critical for preventing sugar crystallization. Without it, your caramels might turn grainy instead of smooth. It also contributes to the desirable chewy texture, making sure your caramels are soft and pliable.
*
Sweetened Condensed Milk: This ingredient is a game-changer for microwave caramels. It adds incredible creaminess, richness, and sweetness, while also helping to thicken the mixture and ensure a smooth, luxurious consistency without the need for excessive cooking time or precise temperature monitoring.
*
A Pinch of Sea Salt: While optional, a sprinkle of flaky sea salt elevates the caramels from merely sweet to exquisitely balanced. The salt crystals provide a delightful textural contrast and perfectly cut through the sweetness, enhancing the complex caramel flavors.
When these basic items come together in the microwave, they transform into a glossy, amber mixture that truly rivals any artisan caramel.
Crafting Your Quick Microwave Caramels: A Step-by-Step Guide
Making
quick microwave caramels is less about precise technique and more about following a few simple steps. Here’s how you’ll achieve caramel perfection:
1.
Preparation is Key: Begin by lining an 8-inch square pan (or similar size) with parchment paper, leaving an overhang on the sides. Lightly grease the parchment paper with butter or cooking spray. This crucial step ensures your caramels won't stick and are easy to remove and cut.
2.
Combine Ingredients: In a large, microwave-safe bowl (ensure it’s *large* enough to prevent boil-overs – at least 4-quart capacity is recommended), combine your butter, granulated sugar, brown sugar, light corn syrup, and sweetened condensed milk. Give everything a good stir to mix it thoroughly.
3.
Microwave in Intervals: This is where the magic happens. Place the bowl in the microwave and cook on high power in measured intervals. A common approach is to start with 2 minutes, stir, then continue with 1-2 minute intervals, stirring thoroughly after each one. The total cooking time will vary depending on your microwave's wattage (typically between 6-10 minutes for a standard 1000-1200 watt microwave).
4.
Stir, Stir, Stir: Thorough stirring between each interval is paramount. This ensures even cooking, prevents burning on the edges, and helps the mixture emulsify into a smooth, homogenous caramel. Use a sturdy whisk or silicone spatula.
5.
Checking for Doneness: How do you know when your caramels are ready without a thermometer? The mixture will become thicker, richer in color (a deep golden amber), and glossy. You can also perform a simple "cold water test": drop a small amount of hot caramel into a glass of cold water. If it forms a firm, pliable ball that holds its shape, it’s done. If it dissolves or is too soft, continue microwaving in 30-second bursts until it reaches the desired consistency. For those who prefer a thermometer, look for the soft-ball stage, which is typically between 238°F-242°F.
6.
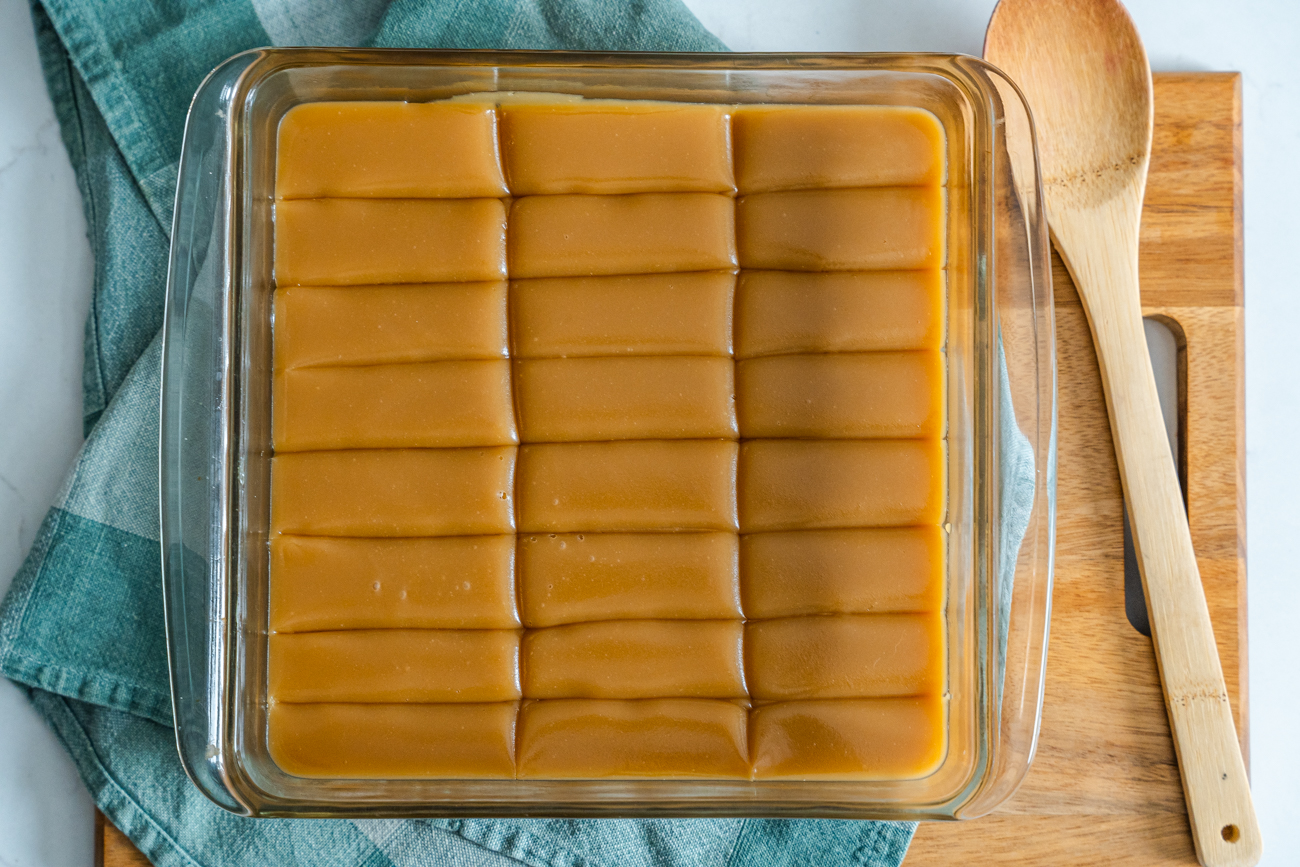
Pour and Cool: Once the caramel is ready, carefully (it will be *very* hot!) pour the glossy mixture into your prepared pan. Immediately sprinkle with flaky sea salt, if desired.
7.
Patience, My Friend: Allow the caramels to cool completely at room temperature for several hours, or even overnight. Resist the urge to cut them prematurely, as they need to fully set to achieve their perfect chewiness. You can also refrigerate them to speed up setting, but room temperature cooling often yields a slightly softer texture.
8.
Cut and Enjoy: Once firm, lift the caramel slab out of the pan using the parchment paper overhang. Place it on a cutting board and, using a sharp, buttered knife, cut it into desired squares or rectangles. For clean cuts, wipe your knife between cuts.
Elevate Your Caramels: Creative Variations and Serving Suggestions
While classic
microwave caramels are divine on their own, their simple base makes them incredibly versatile for customization.
*
Chocolate Dipped Caramels: Once your caramels are cut and firm, melt some good quality chocolate (dark, milk, or white). Dip each caramel half-way or fully, then place on parchment paper to set. A sprinkle of sea salt on the wet chocolate is a fantastic touch!
*
Nutty Caramels: Fold in chopped nuts like pecans, walnuts, or almonds into the caramel mixture just before pouring it into the pan. Alternatively, press them into the top of the caramel while it's still warm.
*
Flavor Infusions: Add a teaspoon of vanilla extract (after microwaving, as heat can diminish its flavor), almond extract, or even a touch of espresso powder to the mixture before the final stir for different flavor profiles.
*
Caramel Swirl Brownies: Use your freshly made caramels (or even melted bits of them) to swirl into brownie batter before baking for an extra layer of decadence.
*
Gifting Perfection: Wrap individual caramels in wax paper or cellophane squares, twist the ends, and arrange them in decorative boxes or bags. They make thoughtful, homemade gifts for any occasion.
Tips for Perfect Microwave Caramels Every Time
Even with a foolproof recipe, a few extra tips can ensure your
microwave caramels turn out perfectly every time:
*
Choose the Right Bowl: A bowl that is too small risks the mixture boiling over, creating a sticky mess. Always opt for a bowl significantly larger than the volume of your ingredients.
*
Don't Skimp on Stirring: As mentioned, thorough stirring is non-negotiable. Scrape down the sides and bottom of the bowl with each stir to ensure all ingredients are evenly heated and combined.
*
Know Your Microwave: Microwave wattages vary. If your microwave is lower wattage, expect slightly longer cooking times. Start with the suggested intervals and adjust as needed. It's better to cook for slightly longer in shorter bursts than to overcook.
*
Proper Storage: Store your finished caramels in an airtight container at room temperature. For best results and to prevent sticking, wrap individual caramels in wax paper or parchment paper squares. They will last for several weeks.
*
Troubleshooting Hard/Soft Caramels: If your caramels turn out too hard, they were likely overcooked (cooked too long or to too high a temperature). If they are too soft and don't hold their shape, they were undercooked. Don't worry, even "imperfect" caramels are usually still delicious and can be melted down into a sauce!
Conclusion
Making delicious, soft, and chewy homemade caramels has never been easier thanks to the simplicity of your microwave. Gone are the days of worrying about candy thermometers or constant stovetop stirring. With a few basic pantry ingredients, minimal effort, and these straightforward steps, you can create a batch of
quick microwave caramels that are perfect for gifting, snacking, or simply satisfying that sweet tooth. So go ahead, embrace the convenience, and treat yourself to the delightful taste of homemade goodness. You'll wonder why you ever made them any other way!